How to Use Your Driveway Scraper
DS-96 & DS-72 Users Guide
Thank you for your purchase of one of our DS Series Driveway Scrapers! With proper use and
care it will provide you with many years of trouble free service!
- Hook Up
The DS series of driveway scrapers are designed to be used on standard type 3-point hitches. Begin by Hooking up the DS-96 or DS-72 to your tractor.
- Adjustment Prior to Use
Once you have attached your DS series scraper to your tractor you will want to adjust it for best performance. This is easiest to do on a level surface such as a concrete pad or similar surface. Using your 3pt, lift the scraper up until it is about 6” off the ground. Turn off your tractor and make sure the parking brake is engaged. Standing behind the unit and visually check to see that the scraper is parallel to the ground from side to side. Make any necessary adjustments with your adjustable lift arm until the unit is level. Once that is completed, do the same from one of the sides of the scraper visually checking to see that it is level from front to back. Make any adjustments with your top link until the unit is reasonably level.

- Final Adjustments
Once the initial setup of the scraper is complete you are ready to begin using it. Once you have re-started your tractor lower the scraper to the surface to be graded. As you begin moving forward take notice of and watch the action of the scraper. As you pull forward does the scraper nose “dig in” or tilt forward? Are the back blades coming off the ground? If that happens you have too much pressure on the “nose” of the scraper. While some nose pressure is desirable, too much is not good. Should you have too much nose pressure lengthen your top link a turn at a time till the front and back blades appear to be doing equal amounts of work. Likewise, if the back blades appear to be doing most of the work then shorten the top link thus lowering the nose. With a little experimentation and some trial and error you will find that “sweet spot” adjustment that works best for you!
Frequently Asked Questions
Weight can be added to the center frame to increase the cutting power of the scraper. An easy and inexpensive way to accomplish this is by using 5 gallon buckets. 4 of these fit nicely in the center frame. Filling them with sand or gravel will give you approximately 50 to 70 lbs of additional weight per bucket.
The scraper can be set in “float” mode or “rigid” mode. The scraper, as shipped, is set, by default, in rigid mode. To set in “float” mode pull the 2 clips from the silver pins on the rear of the frame. The top rear angle is pre-drilled for you to store these pins in when set in float mode. Float mode allows the unit to maintain level even though the tractor may be pitching up and down.
Set ahead and set back: As shipped, the scraper is set in its center position. For tractors with larger tires a user may wish to set the blades back. To do this remove the 2 silver pins mentioned in Tip 2. Remove the center pivot assembly nuts and bolts. Align the center frame bolt holes with the pre-drilled bolt holes on the front of the scraper. Refasten the center pivot assembly nuts and bolts and re-insert the silver pins. For set ahead follow the same procedure except use the pre-drilled rear bolt holes.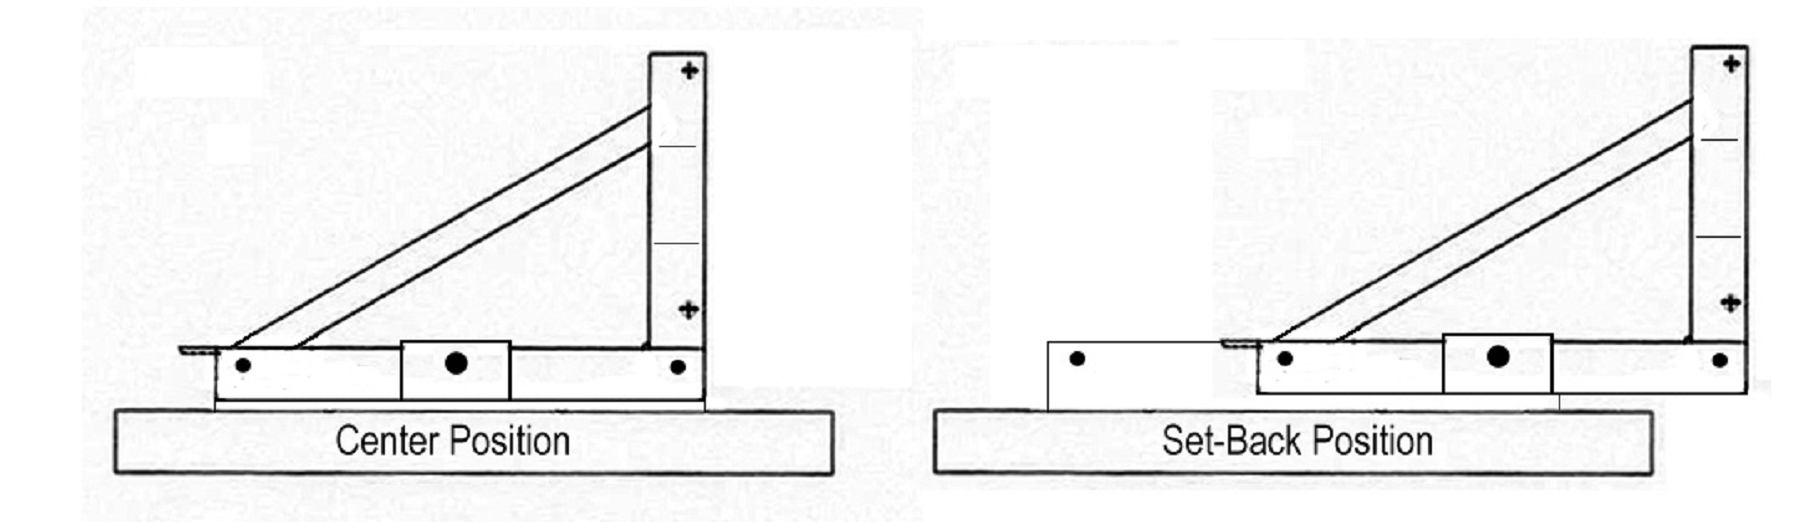
Additional Support
Should you ever have any questions about your DS series scrapers use, need replacement parts OR if you have any suggestions on other uses or additional features you would like to see added we invite you to give us a call or drop us an e-mail. Additionally we would like to invite you to send in any photos of your scraper attached to your tractor and/or in use and, with your permission, post them up on our website.
Contact Support
Agritek Industries, Inc.
4211 Hallacy Dr.
Holland, MI. 49424
Phone: 616-662-0954 ask for Quinn
Email: sales@rapidtekllc.com